Using Excel to Import Products & Services in Dynamics AX
Posted by Author, Curator, Visually Impared Squirrel Literacy Advocate & Dynamics AX Technical Solution Professional (TSP) at Microsoft on
At this point in my GuygAX project (a.k.a. implementing Dungeons & Dragons within ERP), I am working on loading all of the reference products and services into my system so that I can start stocking my shelves and selling services to my NPC’s. This is no small feat, since the initial load has more than 2000 different items. Rather than load all of the data by hand, I decided to use the Excel Add-In and create a import template for loading all of the products and services.
Since there are multiple tables that need to be loaded with this example, it is a little more work to create the initial template, bus once it is up and built, it is a great time saver when loading in base and incremental data.
In this walkthrough I will show how to use the Excel Add-In for Dynamics AX to create and use an Excel Product Import Template
Creating a Product Import Template
The first step in the importing process is to create a template in Excel that is linked to the appropriate tables within Dynamics AX.
In this worked example we will show how to use the Excel Add-In to create an import template for product information.
How to do it…
To create a product import template, follow these steps:
- Open Excel, and then select the Dynamics AX tab on the ribbon bar. Within the Design group, click on the Add Data button, and select the Add Tables menu item to start selecting the base import tables.

-
Browse through the Dynamics AX tables that are available, and select the following:
- EcoResProduct (Base product)
- EcoResProductTranslation (Product description)
- InventTable (Released product)
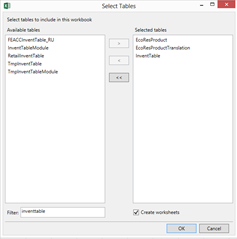
- When you are done selecting the tables, click on the OK button.
-
This will create three new sheets within Excel, and also open up the table explorer on the right. On the EcoResProduct tab, add two additional fields to the table:
- Product type
- Search name

-
On the EcoResProductTranslation tab, add four additional fields to the table:
- Products.InstanceRelationType
- Product name
- Products.Search name
- Description

-
On the InventTable tab, add one additional fields to the table:
- Search name
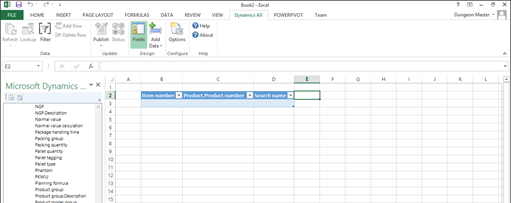
- When all of the additional columns have been added, click on the Fields button within the Design group to return to edit more.

How it WORKS…
To see all of the data that is in the system, click on the Refresh button in the Data group, and select the Refresh all option.

You will now be able to see all of the records in the tables.

Filtering the Products
Rather than see all records, it may be a good idea to filter out the returned data.
In this example we will show how to use the filter option of the Excel Add-In to return back just the information that you are working on.
How to do it…
To filter the data, follow these steps:
- Click on the Filter button in the Data group to open up the Filter results dialog.

- Click on the Add Condition button to add a new condition line, and select the Product number field, and add a filter criteria.

- Now change the data source to the EcoResProductTranslation data source.

- Click on the Add Condition button to add a new condition line, and select the Products.Product number field, and add a filter criteria.

- Now change the data source to the EcoResProductTranslation data source, click on the Add Condition button to add a new condition line, and select the Item number field, and add a filter criteria.

How it WORKS…
To see the filtered data that, click on the Refresh button in the Data group, and select the Refresh all option.

Using the Excel Import Template to Load Products
Once you have generated the import template, you can start using it to load the data into Dynamics AX.
In this example we will show how to load the initial product data.
Getting Ready…
In this example we will start by loading in a number of services. Thanks to the AD&D Downloads site (http://www.adnddownloads.com/equipment.php) I was able to cut and paste all of the descriptions directly into a reference spreadsheet. The main information that I will use though is the Code, and the Description.

How to do it…
To import the data using the Excel Template, follow these steps:
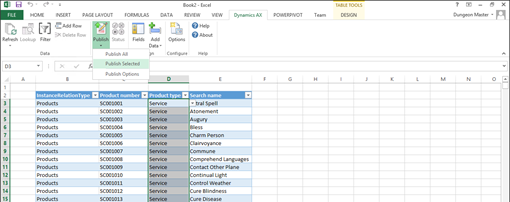
- Select the EcoResProduct tab, and paste in the product codes into the Product number column, and the descriptions into the Search name column. Notice how it color codes the new records that you are adding.

- Now select the Products option from the InstanceRelationType column and then copy the field into the other records.

- In this case we want all of the items to be a service, so we will select Service from the Product type field and then copy the field into the rest of the records.

- Now that we have the base product data in, we can click on the Publish button in the Design group and select the Publish All option.
How it WORKS…
After this is done, if you switch to the Dynamics AX Status tab that is created, you will be able to see if there were any errors in the load caused by incorrect data, of columns with data that exceeds the default field size etc.

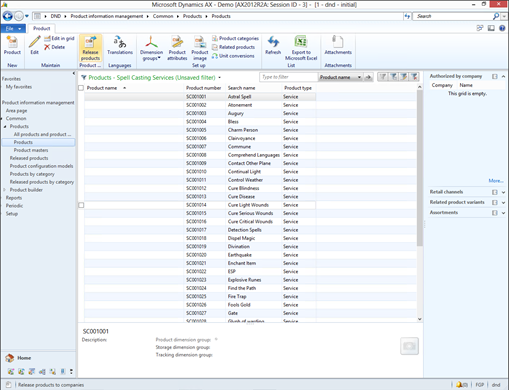
Returning back to the Products form in Dynamics AX, we will now see all of the products. They are missing the description through, because that is referenced from the EcoProductTransaltions table, so we need to populate that table now.
Importing Product Translation
All of the product descriptions are stored in the Product Translations table rather than the base product table. So in order to see the descriptions we need to load that table and reference it back to the parent table.
In this example we will show how to load the product translations through the Excel template.
How to do it…
To import the product translations using the Excel Template, follow these steps:
- In the Excel template, select the EcoResProductTranslation sheet and copy over the code and descriptions.

- Then specify the language for the descriptions – in this case US English.

- And then set the Products.InstanceRelationType to Products.

- Click on the Publish button in the Design group and select the Publish All option
How it WORKS…
When you look at the products within Dynamics AX, all of the descriptions should be populated.

Importing Released Products
The final step in the process is to load the Released Products table so that we can use it within our company.
In this example we will show how to populate the Released Products table through the Excel Import template.
How to do it…
To import the released products using the Excel Template, follow these steps:
- In the Excel template, select the InventTable sheet and copy over the code and descriptions. Note that you need to specify the code twice since one is the Release Product Item Code and the other is the Product Number for the base product.

- Click on the Publish button in the Design group and select the Publish All option
How it WORKS…
When you look at the Released Products within Dynamics AX, all records should now be available.

Adding Additional Import Field Columns
There may be other fields that you would like to populate in bulk through the Excel template. This is not a problem, all you need to do is add them to the template.
In this example we will show how you can extend out the template to allow you to import more data through the template..
How to do it…
To add more field columns to the Excel Template, follow these steps:
- Click on the Fields button in the Design group of the Dynamics AX tab, and add them into the worksheet.

- Then you just fill in the fields, and click the Publish button to update the records.
Reusing the Product Import Template
Setting up the template takes a little bit of work, but once you have created it, you want to take advantage of it as much as possible through re-use.
In this example we will show how easy it is to load more data once you have the template.
How to do it…
To reuse your Excel Template, follow these steps:
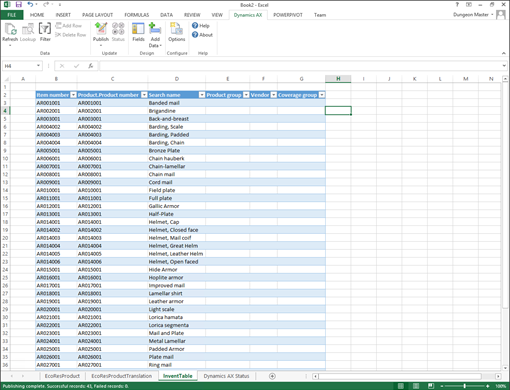
- Once you have the base template created, you can easily reuse it to load other subsets of data. All you need to do is cut and paste in the data into the three sheets, and click the Publish button.
How it WORKS…
In this case, the setup and loading process should take minutes at the most.

Importing Detailed Product Descriptions
Another benefit of the Excel import is that detailed descriptions are much easier to cut and paste in bulk into the spreadsheet rather than into each individual record.
In this example we will show how you can update detailed descriptions through the Excel template.
How it WORKS…
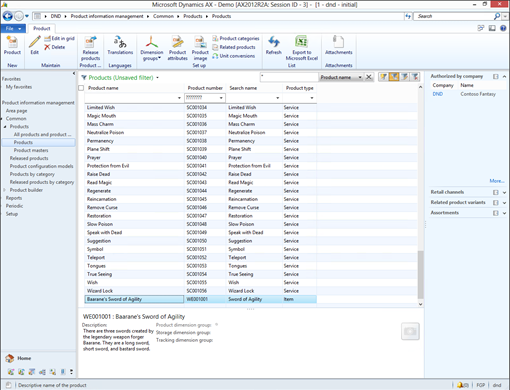
If you have detailed descriptions, loading them into the spreadsheet is a breeze as well.

After publishing the descriptions they show up on the products.
Creating Better Import Load Templates
If you are going to be loading a lot of information, you can save a little bit of time by preformatting the data within the Base Data sheet so that you can cut and paste entire table blocks rather than having to cut and paste by column.
In this example we will show how to create a better data import load sheet within Excel.
How it WORKS…
To create a better template, copy the columns from the import sheets over into the base data sheet, and then use formula’s to populate the data. Now when you change the data in the base sheet, all you need to do is copy the table of data over into the load tables.

Summary
This is just a simple example of how you can use the Excel Data Import Add-In to easily load data into the system. Although we only imported product information, there is not reason why you cannot do the same to load other records as well such as:
- Customers
- Vendors
- Bills Of Materials
- And even transactional information like Sales Orders.
Give it a go and try it out.
Share this post
- 0 comment
- Tags: Dynamics AX
0 comment
